Sunday 1 September 2024

How to Build a Full-Stack Web App with Blazor


Blazor Stack Overview

Important Points: Blazor stack gives you options to create Web Applications without writing JavaScript (doesn't mean you can't use JavaScript). So, it is obvious that Micrsoft is making c#  to flourish on client side also. So, in nutshell Blazor makes it possible to create Dynamic Web app only using c# . How? Let us understand it

Microsoft Blazor is a modern web framework that allows developers to build interactive web applications using C# and .NET instead of JavaScript. It is part of the ASP.NET Core framework and enables the development of rich, client-side web applications with .NET, providing an alternative to traditional JavaScript frameworks like React, Angular.

The Blazor stack can be understood as the combination of several technologies and components within the.NET ecosystem that come together to provide a full-featured platform for building web applications. Here’s an overview of the key components and technologies that make up the Blazor stack:

Blazor Hosting Models

Blazor provides two primary hosting models, each with different deployment scenarios and architectures:

  • Blazor Server:

    • Runs the Blazor application on the server.
    • UI updates and event handling are performed on the server, and updates are sent to the client over a SignalR connection.
    • The client renders the UI and communicates user events back to the server.
    • Ideal for applications requiring rapid load times and those that can tolerate network latency for UI interactions.
  • Blazor WebAssembly (Blazor WASM):

    WebAssembly (WASM) is a binary instruction format that allows code written in languages other than JavaScript (like C, C++, Rust, and others) to run on the web. It is designed to be a portable, compact, and efficient format that can be executed in modern web browsers at near-native speed. WebAssembly provides a way to run code on the web that is faster and more efficient than traditional JavaScript, especially for compute-intensive tasks. Key Concepts: Binary Format: WebAssembly is a low-level binary format, which is compact and designed for performance. Portability: Code written for WebAssembly can run on any platform that supports WebAssembly, making it highly portable. Language Agnostic: WebAssembly is not tied to any specific programming language. Code written in languages like C, C++, Rust, and others can be compiled to WebAssembly. Interoperability with JavaScript: WebAssembly can interact with JavaScript, allowing developers to call WebAssembly modules from JavaScript and vice versa.

    • Runs the Blazor application entirely on the client using WebAssembly.
    • The application, including the .NET runtime, is downloaded to the client’s browser and executed there.
    • Offers offline capabilities and reduces server load, but with a larger initial download size.
    • Ideal for public-facing applications where offline support and client-side processing are important.

    Important Points:  We can finally share code (assemblies) between client and server. You can define Enums, validation logic, some business rules, etc. once and use them everywhere. Yes, it’s going to be the same language on both ends (Client or Server Side).

.NET Runtime

Blazor applications are built on the .NET platform, which provides a robust runtime for executing C# code.

  • .NET Core/.NET 5/6/7+:

    • The Blazor framework is part of the ASP.NET Core framework, which runs on .NET.
    • For Blazor Server, the .NET runtime executes entirely on the server.
    • For Blazor WebAssembly, a WebAssembly-based .NET runtime is downloaded to the client and runs in the browser's sandboxed environment.

Razor Components

Blazor uses Razor Components as the fundamental building blocks of its applications.

  • Razor Syntax:

    • Razor is a markup syntax that allows embedding C# code into HTML. Razor Components are reusable, encapsulated units of UI that combine HTML markup with C# code.
    • Components can be nested, reused, and parameterized, making them highly flexible and modular.
  • Component Model:

    • Each Razor Component is a .razor file that defines the UI structure and behavior using a combination of HTML, C#, and Razor syntax.
    • Components can handle events, manage state, and interact with other components or services.

Data Binding and Events

Blazor provides rich data-binding capabilities and event handling mechanisms.

  • Two-Way Data Binding:

    • Blazor supports two-way data binding, allowing data in the UI to stay in sync with the underlying component state.
    • This is similar to what is found in frameworks like Angular and React but done using C#.
  • Event Handling:

    • Blazor allows handling DOM events such as clicks, input changes, and form submissions directly in C# code.
    • Event handlers are defined in components and can trigger UI updates or other actions.

Dependency Injection (DI)

Blazor supports the use of dependency injection, a design pattern used to manage service dependencies.

  • Service Registration:

    • Services such as data repositories, API clients, and logging can be registered and injected into Blazor components or services using the built-in DI container provided by ASP.NET Core.
    • This promotes a clean separation of concerns and makes components more testable and maintainable.

Routing

Blazor includes a routing system that allows navigation between different components or pages in a Blazor application.

  • Router Component:

    • The Router component is used to define the routes for your application.
    • Routes map URLs to Razor components, enabling client-side navigation without refreshing the page.
  • Parameter Passing:

    • Route parameters can be passed to components, allowing dynamic content generation based on the URL.

JavaScript Interoperability (JS Interop)

While Blazor aims to minimize the need for JavaScript, there are scenarios where interacting with JavaScript is necessary.

  • JS Interop:

    • Blazor provides JavaScript Interoperability (JS Interop) to call JavaScript functions from C# and vice versa.
    • This allows Blazor to integrate with existing JavaScript libraries or frameworks and perform tasks that require direct DOM manipulation or access to browser APIs.

State Management

Blazor provides several ways to manage state across components and user sessions.

  • Component State:

    • State can be managed within a single component, passed between components using parameters, or shared across components using services.
  • Persistent State:

    • State can be persisted using tools like local storage, session storage, or server-side storage when necessary, especially in Blazor WebAssembly.

Security

Blazor includes several features to help secure your applications.

  • Authentication and Authorization:

    • Blazor integrates with ASP.NET Core Identity for authentication and supports OAuth, OpenID Connect, and other security standards.
    • Policies, roles, and claims-based authorization are used to control access to components, pages, and APIs.

Integration with ASP.NET Core

Blazor is a part of the ASP.NET Core ecosystem and integrates seamlessly with it.

  • Server-Side Features:

    • Blazor can interact with ASP.NET Core services like MVC, Razor Pages, Web API, SignalR, and Entity Framework Core.
    • This enables full-stack development within the .NET ecosystem, including server-side data access and processing.

Tooling and Development Environment

Blazor development is supported by rich tooling in Visual Studio and Visual Studio Code.

  • Visual Studio Integration:

    • Full IntelliSense support for C#, Razor syntax, and component development.
    • Integrated debugging, project templates, and scaffolding for Blazor applications.
  • Live Reload and Hot Reload:

    • Blazor supports live reloading of UI changes during development, speeding up the feedback loop.

How to Build a Full-Stack Web App with Blazor

I am sure got to know why you must think about building a full-stack web app with Blazor, let us have a look at the steps that you must follow to ensure error-free and seamless development and delivery.

1. Create a New Blazor Project

After you open Visual Studio, click on Create a new Project and type Blazor in the search box and press Enter. You can select the available Blazor Web App template and can click on Next to move to the Configure Your New Project Window. I recommend adding a recognizable project name and clicking on Next; then, in the Additional Information window, choose .NET 8.0 (Long Term Support) from the Framework drop-down and click on Create button.

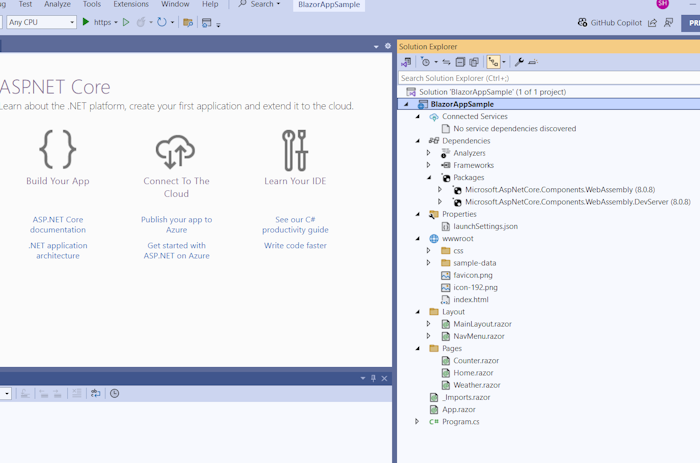
2. Explore the Overall Project Structure

If you have followed the above steps correctly, your new Blazor project will be created and you will be available to view the contents in the Solution Explorer page. Some common files and a brief description about them are as follows: -

Program.cs : acts as the entry-point for the Blazor app and is used to start the server and configure the app services and middleware (if any).

App.razor : contains the app’s root components.

Routes.razor : used to configure the complete Blazor router.

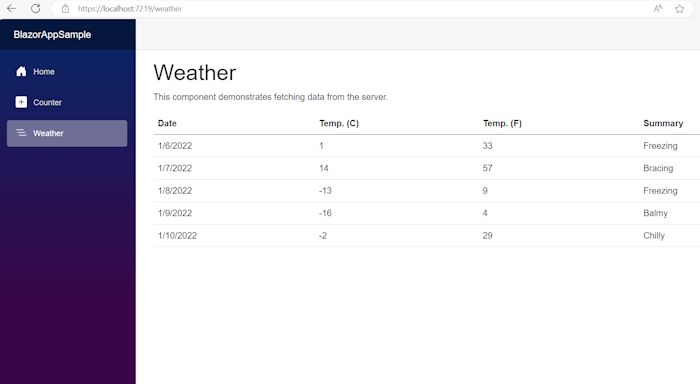
Components/Pages directory: contains all example web pages that you can check out for your Blazor app.

BlazorApp.csproj : used to define the app project and the dependencies it has.

launchSettings.json inside Properties directory : lists the complete definition of different profile settings for your local development environment.

3. Understand the Main Blazor Components like Pages, Components, and Services

Pages : Can be considered as the top-level view of your Blazor project that can be accessed via an URL.

Components These can be referred to as the building blocks that can be glued together to be used as a foundation of your Blazor app.

Services In Blazor, service classes contain the code that fetches and logs any data that is not a part of the application’s UI component.

4. Local Running of the Application

To run your Blazor app locally, click on the Start Debugging (or the green arrow button) available in the Debug Toolbar; now, once your app is running, you can click on the Hot Reload button in case you want any code changes to be reflected. You can click the Stop button in the top toolbar to stop your application at any time; but, an important point to note is that the first time you run your application in Visual Studio, a development certificate will be set up to host your app over HTTPS and will prompt you to trust the certificate.  
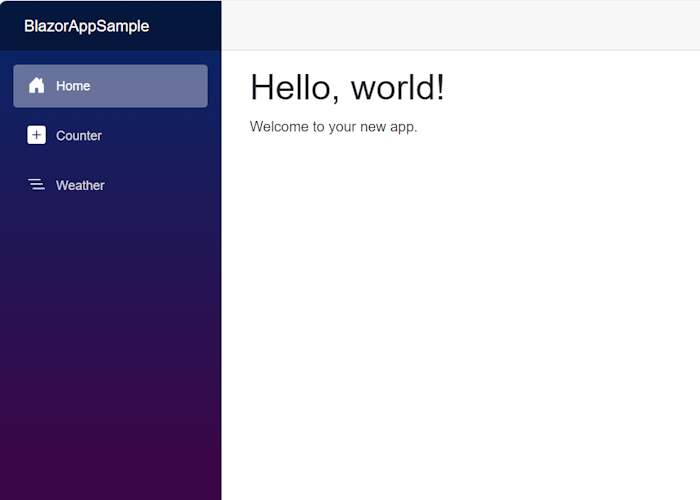
Creating Components

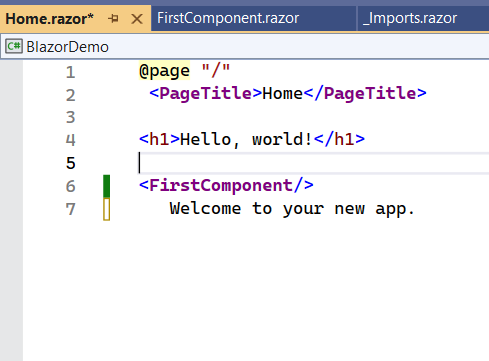
Let us Create and add Component(folder name could be of your choice) Folder to root of the Solutions. Once you've created the new Components folder, create a file within it named MyFirstComponent.razor and enter the following mark-up.

We have two ways to add this component refrence to Page where you want to consume or render this component
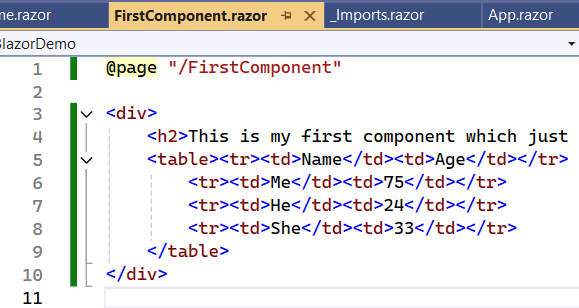
  • Now edit the home.razor file. At this point we can either reference the component with a fully qualified name: <BlazorDemo.Components.MyFirstComponent />
  • Or edit /_Imports.razor and add @using BlazorDemo.Components. The using statements here are cascaded into all Razor views - which means the mark-up to use the new component in /Pages/home.razor no longer needs a namespace.

Let us run this Blazor App

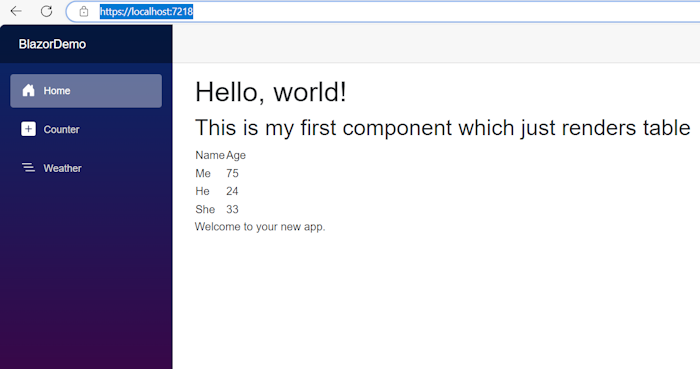
Difference between Blazor Server App and Blazor Client App

Blazor is a web framework developed by Microsoft that allows developers to build interactive web applications using C# and .NET instead of JavaScript. Blazor can be implemented in two main hosting models: Blazor Server and Blazor Web Assembly (Client-side). Below are the key differences between these two models:

1. Hosting Model

  • Blazor Server App:

    • The application runs on the server. The UI updates and event handling are performed on the server, and the results are sent to the client over a SignalR connection.
    • The client (browser) only handles the rendering of the UI and relays user events to the server, where they are processed.
    • No WebAssembly is used on the client side.
  • Blazor WebAssembly (Client-side) App:

    • The application runs entirely on the client within the browser using WebAssembly.
    • The entire Blazor application, including .NET runtime, is downloaded to the client’s browser.
    • The application runs directly in the browser's memory and interacts with the DOM without involving the server for UI updates or event handling.

2. Performance and Latency

  • Blazor Server App:

    • Performance can be impacted by network latency because every UI update and event handling operation involves a round trip to the server.
    • The server handles the state and logic, which means faster load times since the browser only loads minimal static content.
    • Suitable for scenarios with reliable, low-latency networks.
  • Blazor Web Assembly (Client-side) App:

    • Once the application is loaded in the browser, it runs independently of the server, providing a more responsive and interactive experience since there is no network latency for UI updates.
    • Initial load times can be longer because the entire application (including the .NET runtime) needs to be downloaded to the browser.
    • More suitable for scenarios where offline capabilities and responsiveness are critical.

3. App Size and Load Time

  • Blazor Server App:

    • The initial download size is minimal because only the static assets and the SignalR connection script are downloaded.
    • The server-side processing means the client is lightweight.
    • The server has a constant connection to the client via SignalR.
  • Blazor WebAssembly (Client-side) App:

    • The initial download size is larger because the application and .NET runtime are downloaded to the browser.
    • After the initial load, the application does not need a constant connection to the server to function.
    • The app can work offline after the initial download.

4. Scalability

  • Blazor Server App:

    • The server must manage multiple SignalR connections, maintain UI state for each client, and handle all processing, which can limit scalability, especially in high-user environments.
    • Requires more server resources to manage multiple concurrent users.
  • Blazor Web Assembly (Client-side) App:

    • The client-side model is more scalable because the server is only needed for API calls or data access; the client handles the rest.
    • Server resources are conserved as the processing and state management are offloaded to the client.

5. State Management

  • Blazor Server App:

    • The application state is managed on the server, and the server must keep track of the state for each connected client.
    • Automatic reconnection features help preserve state if the connection is temporarily lost.
  • Blazor WebAssembly (Client-side) App:

    • State is managed on the client. Developers must manage state persistence manually if needed (e.g., using local storage or session storage).
    • The state remains with the client, so the application continues to run even if the server is disconnected.

6. Security

  • Blazor Server App:

    • The server handles all business logic and data processing, making it easier to secure since sensitive data does not need to be exposed to the client.
    • Vulnerabilities mainly relate to the SignalR connection, such as potential issues with connection management and DoS attacks.
  • Blazor Web Assembly (Client-side) App:

    • The entire application, including business logic, is downloaded to the client, which can expose it to potential tampering. Sensitive operations should still be handled on the server via API calls.
    • Security measures such as encryption and obfuscation can mitigate risks, but they do not eliminate them.

7. Offline Support

  • Blazor Server App:

    • Limited to no offline support because it relies on a constant server connection via SignalR.
    • If the connection is lost, the application cannot function until it is reestablished.
  • Blazor Web Assembly (Client-side) App:

    • Offers better offline support because the application runs entirely in the browser once downloaded.
    • Can continue to function with local data even when the network is unavailable, and sync with the server when the connection is restored.

8. Use Cases

  • Blazor Server App:

    • Best for internal applications with controlled environments where network reliability is strong and latency is minimal.
    • Ideal for scenarios where the initial load time is critical and you need to minimize client-side resource usage.
  • Blazor WebAssembly (Client-side) App:

    • Suitable for public-facing web applications where offline support, responsiveness, and reduced server load are important.
    • Ideal for applications that need to be highly responsive with less dependency on server round trips.

Conclusion

  • Blazor Server is best for applications where server-side processing, security, and minimal initial load times are important, but it requires a constant, low-latency connection to the server.
  • C is better for scenarios requiring offline capabilities, scalability, and client-side performance, but it involves a larger initial download and potential security concerns due to client-side execution.

Choosing between Blazor Server and Blazor Web Assembly depends on your application's specific requirements, including performance, scalability, security, and user experience.

Friday 24 June 2016

HOW TO BUY ,CREATE & HOST OR DEPLOY YOUR OWN WEBSITE


Introduction

A website is a collection of Web pages, images, videos or other digital assets that is hosted on one or several Web server(s), usually accessible via the Internet, cell phone or a LAN.
The definition of web page is a document, typically written in HTML, which is almost always accessible via HTTP, a protocol that transfers information from the Web server to display in the user's Web browser. Don't be confused.In some cases your page extension will be .aspx, .php.... but if you will open these pages ,they will also contact html markup code.
Every business needs a web site, that much is known. Billions are spent online every year and a website is way cheaper than other forms of traditional advertising. This tutorial explains how it all works and how you can maximize your investment. Getting a website can be very confusing. There are lots of different things involved, and lots of acronyms. Even if you don’t decide to work with us on your website, there is lots of useful information here that may well make your life easier. This is an article explains "How to Buy , Create & Launch your first Business/Personal website" in plain English for regular User , Junior web developer or business man .

How Website Work

Assume , you trying to access website namely www.shabirshop.com,what happens when you type in http://www.shabirshop.com Here are high-level sequence of steps which occur when you type website url in browser

Before trying to make your own web page and launch it on the Internet, first you need to know how web pages work. Here are the basic terms:
  1. The server receives the request for a page sent by your browser.
  2. The browser connects to the server through an IP Address; the IP address is obtained by translating the domain name.
  3. In return, the server sends back the requested page.
Web pages are written in HTML, Hypertext Markup Language. A markup language is a computer language that describes the layout, format and content of a page. The Web browser renders the page according to the HTML code.
Web servers are computers whose job is to respond to a browser’s request for a web page and deliver it through the internet. Pages hosted on a web server can be displayed to anyone all over the world. It is like a hard drive that stores your website files and images. In order to host your page on a web server you need to pay a hosting charge.
In order to display your website on the internet, you need a web hosting provider. You could set up your own hosting server at home, but it would take a huge amount of knowledge and require a lot of time to set up. Paying a hosting service offers you a lot more freedom for your site, gives you opportunity to do professional work and is a reliable solution.

Prerequisites

You need to have:
  1. Basic understanding of computer
  2. How to buy some products online
  3. How to create account /Register for websites like facebook,google,Hotmail...
  4. Finally your business for which you want to create website.
As mentioned above that, I assume you have basic computer knowledge.Before starting Design/development of website, Let you ask some basic & simple questions to yourself like:
  1. Why you want to create website for your business?
  2. What type of business you have ?
  3. Is it Local Business or International business?
  4. Do you want to sell your business items/products via your website (online) or you want website just for the sake of publicity & showcasing your business to people on internet?
After having look on above questions, sure, you know your business,so obviously requirement for your website also. Now, Looking to the above four question,I assume on behalf of you & answered your questions like shown below:
Answer to Question 1: I want to create website for
a) publicity/advertisement
b) people can see all information about my business on internet.
c) they can contact me anytime. if they need or want to buy anything from my products listed on my website.
Answer  to Question 2: Anything from small  need to bigger one. i mean anything what we sell on our shots/stores..
Answer to Question 3: This business is local  & may become international in future
Answer to Question 4: In our case,I will  first create website just for the sake of publicity & showcasing your business to people on internet. Next ,I will pick dynamic website
When moving your  business/shop to internet , you can create static website or dynamic website. So, what  each type of website is used for is explained below.

STATIC WEBSITE :

This type of website is just a simple website or multiple webpages which displays information about your business. Assume,you created your static website,Users or web visitors can just go to internet  & type in www.shabirshop.com . this will open your site in browser which will describe or provide overview about your business but can't buy anything online from your website. Simple,it is just website with plain information about your business,like what products you sell , how many branches you have,what discount you give....In case of static website , you don't have option of interacting with the website owner /business owner via website except contact us page which is used to send email to website owner. & who know whether owner checks his email regularly?

DYNAMIC WEBSITE :

This type of website is dynamic in nature like you can provide information about your business,products .. plus option of buying selling  with in website like amazon,E-bay,overstock..We can chat with user once he visits your website. Visitor can also send request and get back responses from website/business owner via website.Now,decision is yours but important point here is cost of website development . When it comes to development cost ,static websites cost very less & dynamic websites obviously costs 5 times more than  static website some time more..
So, Let we consider both cases step by step. As a business man, let you decided to go for Static website first because both site (static and dynamic website) have all steps common except development step, which is obviously bit time consuming for dynamic website.
Important Point: All websites which give you option like creating account ,login and buying,selling online are dynamic website because they use some data store/Databases to save all the user,transaction details.On the other hand Static websites are plain static webpage with information about business,products....
LET WE PICK FIRST CASE AS STATIC WEBSITE: I have business shop where i sell lots of products ,It can be anything . let me assume groceries shop where i sell all types of eatables & you know that your shop provides good discount , huge variety, quality... for the consumer. Now for setting up your website online, i mean on internet you need to fallow below steps.

BUY/REGISTER DOMAIN NAME FOR YOUR BUSINESS:

This is just like how you choose or get your phone number.In case of website Domain Registration, you have check what type of domain suites you like explained below:
1) WHAT TYPE OF DOMAIN YOU ARE LOOKING FOR
 There are lots of domain types available like .com,in,edu,org... .the extension itself speaks what they are meant for  like, .edu is for education,.org is for organization like wise you   know you have commercial business so, you will choose .com(commercial) extension for your website.
BEST OPTION? Avoid the weird extensions and go with .com, .net or .org unless they perfectly describe what you have to offer – and even then, see if you can find a more common name.while .com, .org and .net are commonly used and easily remembered, the domain extension craze hasn’t really gone mainstream yet – so people may not find you if you use a really different domain extension.
2) FROM WHICH SERVICE PROVIDER YOU WANT TO BUY IT
There are thousands of service providers but some known Service Provider from whom you can buy domain is google,godaddy,bigrock,hostgear... Now, Let me assume you are buying domain from BIG-ROCK OR GODADDY not necessary . you can choose any service provider you like .Here for the simplicity & availability sake ,i will prefer to choose godaddy. Let us start ..
Here are the steps

BUYING DOMAIN NAME

IMPORTANT NOTE: IT IS NOT NECESSARY TO BUY YOUR DOMAIN FROM GODADDY, YOU CAN CHOOSE ANYONE FROM THIS LIST
BUYING FROM ANY HOSTING SERVICE PROVIDES YOU SAME PATTERN(WAY) OF BUYING DOMAIN & HOSTING SERVICE. ONLY DIFFERENCE IS THAT SCREENS WILL CHANGE FROM ONE HOSTING SERVICE  TO OTHER. THEY ARE FUNCTIONALLY SAME. COST MAY VARY BIT.
Let us open our favourite browser and type in www.godaddy.com
Go to http://www.godaddy.com
Check whether domain is available
See the success message about domain availability
YOU CAN CLICK ON ' GET IT NOW'  BUTTON & PAY THE AMOUNT ONLINE.
CONGRATULATION! YOU ARE BOUGHT YOUR DOMAIN
IMPORTANT POINT:
Till here we have chosen  domain name . you have two options here like
a) Pay to buy Domain Name  becuz you can buy web hosting later also
b)Continue with buying web hosting along with domain

Assume you are done with purchasing domain. In real time ,domain name alone is not going to help you to make your website online. I Agree, domain name is yours but you can't do anything with it except claiming that it is yours :)  so, better buy some hosting space ( space on server where you will keep your website information like images, documents...) also.  Let us continue with buying web hosting also because we have decided to make our business online. In case,if you don't have budget to buy web hosting now,you can just book domain name only to keep it safe before someone else takes. I mean web hosting we can buy later also once our website is ready.


Tips for choosing my domain name?

There are few things that can help you choosing your domain name like Easily memorable & catchy name which can be easily remembered like when you choose your phone number , you want it to be easy & catchy.Same logic applies here while choosing your domain name
There’s one rule that always applies to domain names: If you like it, go for it.

BUYING WEB HOSTING

On basis of Operating system, you have mainly two types of Hostings available

1) WINDOWS BASED HOSTING: Hosting server o/s is windows operating system
2) LINUX BASED HOSTING: Hosting server o/s is Linux operating system
Now on basis of each operating system, there are different types of web hosting. The most common are:
SHARED HOSTING. This is where you share a web server with other websites. Actually web-server on which we host website can host multiple websites so it would be like occupying a small shop within the whole shopping complex area.
VIRTUAL SERVER or VPS HOSTING. VPSes are similar to shared hosting, but you have more space and resources. it would be like owning an entire floor within whole shoping complex area.
DEDICATED SERVER HOSTING . With a dedicated server, the website takes up 100% of the web server.  it would be as if they owned the whole shoping complex area.
For most of us, a shared hosting plan would be more than enough. Even this website is hosted on a shared hosting plan. A good shared hosting plan will cost you about $70 – $200 per year ($6 – $20 per month).


IMPORTANT POINT: While buying your domain, there will be lots of option associated with domain or website you buy like
1) Keep your domain safe  buy security cost per year 20$ or 999Rs
2) Buy tools to design your website
3) buy bla..bla..
DON'T SELECT ANYTHING AS OF NOW OTHERWISE YOUR DOMAIN & WEBSITE COST WILL GO HIGH. JUST BE SPECIFIC IN BUYING DOMAIN AND HOSTING. WE CAN BUY LATER ALL THESE PACKAGES /TOOLS IF NEEDED.
WHERE ARE YOU NOW?

You have bought domain and space/web hosting but as of now your space is empty. Next, your job is to create website and copy that website into your hosting server which you have bought.
Note: you will receive username & password from service provider once you make the payment

CREATING WEBSITE

In real life, customers go to the ABC Shop outlet to buy or see some products,same way website is shop outlet made of webpages , visitors come to view web pages.Every page you view on internet is a webpage

HOW TO CREATE WEBPAGE

Creating website is job of web developer/Designer & for developing small website you at least require knowledge of HTML & CSS
Here you have two options now
1) Out Source this . I mean give this contract to some web developer/designer .
2) Do it by your own if you know HTML & CSS
Let me assume you decided to do it by your own. How you are going to start? Remember , you site is just a static website which is going to showcase your business on the internet.

THOUGHT ABOUT CREATING WEBSITE

Although there are many considerations in web design, as a beginner, your first step is to actually get something out onto the web. The fine-tuning can come after you've figured out how to publish a basic web page. One way is to use a WYSIWYG ("What You See Is What You Get") web editor to do it. Such editors allow you to design your site visually, without having to muck around with the technical details. They work just like a normal word processor.
There are a number of free and commercial web editors around. One free (and open source) editor for Windows, Mac OS X and Linux is BlueGriffon. You can find a guide on how to use this editor from my BlueGriffon Tutorial. The guide takes you through the process of designing a website from scratch so that you end up with a fully-functional site, complete with multiple pages and a feedback form. (Instructions on how to get BlueGriffon can be found in that tutorial.)
For those who prefer to use a commercial program, thesitewizard.com has numerous online tutorials for a web editor called Dreamweaver. The Dreamweaver Tutorial: How to Design a Website with Dreamweaver CS6 also takes you through all the steps needed to design a complete website, in addition to providing you with the theoretical and practical foundations that will help you create and maintain the site.
There are many other web design software around. If you prefer not to use either of the above, you can find tutorials for other WYSIWYG web editors here, including one for KompoZer, another free (though somewhat outdated) web editor. And if none of them suits your taste, there are also numerous other programs listed on thefreecountry.com's Free HTML Editors and WYSIWYG Web Editors page.
After you have followed my tutorial, and are on the way to designing your website, you might want to read the article Appearance, Usability and Search Engine Visibility in Web Design as well. It takes a brief look at some of the real world issues that every web designer must deal with.
An integral part of web design is search engine readiness. Search engine promotion does not start after the web site is made. It starts at the web design stage. The article 6 Tips on How to Create a Search Engine Friendly Website is a must-read. Moreover, How to Improve Your Search Engine Ranking on Google is also important for the simple reason that Google is the most popular search engine around, at least at the time this page was written.
There are many other issues regarding the design of web pages. The above will get you started. However, if you have the time after you get something out onto the web, you may want to read my other articles on Web Design and Website Promotion and Search Engine Ranking.
LET ME CHOOSE WEB EXPRESSION TOOL TO DESIGN WEBPAGES
Go to this website and download this tool Microsoft Expression Web 4 (Free Version) .I am sure that this is only best web designer tool which is free and has all options just like Ms Word application where you create word documents and only difference is that you create html web documents/sites  using this tool. you will love it
once downloaded fallow below steps to create first or home page of your website

As mentioned above that when webpages are grouped together/ linked together in same folder or different folder they form website. Now let us see How website for your online shop can be created quickly
CREATE WEBSITE:There are multiple ways to create website in Web expression
1) GENERAL WEBSITE
2) TEMPLATE BASED
Based on your choice you can select what you are looking for like shown below


1) GENERAL WEBSITE : You can simple choose New website option from toolbar/menu General option like shown above
2) TEMPLATE WEBSITE:This site is template based available already in web expression as shown above
Let us create template based website for our online shop because it is quickest way to create website for your business. Fallow below steps:-
1) Click on option "TEMPLATE"  Website like shown below

Once selected,it will automatically create all pages of your site .

Now , if above fig shows website folder structure and let us first open default.html page and see how home page looks like


 Finally , you can change every page as per your requirement/need like shown above.

Testing Your Website

Although I list this step separately, it should be done throughout your web design cycle. I list it here to give it a little more prominence, since too few new webmasters actually perform it adequately.
You will need to test your web pages as you design them in the major browsers: Chrome, Firefox, Safari and Internet Explorer 11. All these browsers can be obtained free of charge, so it should be no hardship to get them. Unfortunately, directly testing your site is the only way you can be really sure that it works the way you want it to on your visitors' machines. And those with access to Windows 10 should also test with Microsoft Edge, the successor to Internet Explorer. In addition, if you have a smartphone, try out your site there too. if you website is visible perfectly in all mobiles,tabs,pc,laptops then you can claim that your website is RESPONSIVE.

HOST WEBSITE ON THE INTERNET

After finishing website design/development your website pages, content,images , you’re now going to put entire folder which contains everything on hosting server.
Login to your account and fallow below steps


Click on upload & choose your webpages/images to upload from your computer folder.


EMAIL ADDRESSES

Many businesses still run from a personal email account. You get at least one email address with your domain name and hosting package such as info@mycompany.co.uk, and using this email account comes across as more professional that company532@free_email.com or similar!

Congratulations – you’re ready to see you site live!

Finally open your favourite browser & type in your website domain name which looks like www.shabirshop.com in my case .
I hope you found this guide really useful –but if you have any more questions or need help with one of the steps I highlighted, I’m happy to share some guidance. For this, use my contact/support page.
Last, but not least..
If you find my guides useful, please share my page below. This keeps me motivated to keep all the information on this site up-to-date and accurate.

Thursday 3 March 2016

What Technical Specification document contain?

Introduction

What is technical specification? Technical requirement pertains to the technical aspects that your system must fulfill, such as performance-related issues, reliability issues, and availability issues.
Technical specifications documents(TSD) plays a major role in conveying understanding of the project to any reader in the software industry. There are usually  multiple  types of users/audiences who refer to technical specification document..

  1. Developers, Project Managers, Tech Leads and Technical Architects who will be directly working on the Project
  2. Client Personnel's like Technical architect, CIO’s, Project Managers to whom  project is delivered or  Project belongs

 I am  sure  that technical specification should  satisfy all the intended audiences/ users. There will be  certain things from the document which may prove unnecessary to the other because the way developer thinks is different from technical architect or customer.. So, better we can split document into two separate documents or document itself into two main sections. let we see how we will go for it

Document for customer overlook:

Generally customer approves the technical design, so it is obvious to convince the customer and assure him that all the technical details are covered in the document and system can meet desired goals. So while preparing document it is very necessary cover all such points those will help convincing the client technical person. Technical architect from client will not be interested to know details at class levels or class diagrams, he will be interested to know Whether system is complying its requirements, those may be in terms of

  1. Functionality: This section should include application functionality in detail with diagram
  2. Deployment environment: This section should include complete detailed diagram with explanation about deployment model.
  3. Depicting the overall architecture: this section i am explaining below..
  4. Technology Stack you are proposing with licensing considerations(if any):This section explains use of technologies, languages and databases and how they fit in this project along with licensing details if any.
  5. Is there any third party component used:This section gives overview of third party components/services used
  6. Need more infrastructure/hardware to be purchased: This section explains need of hardware to be purchased for this project deployment
  7. Platform Required: This section gives details about O/S,Servers,databases required for this project to run

So one should prepare a document should give complete outlook of the system and no of pages may vary depending on project. Here is detailed table which gives overview of no of pages we can have in technical specification document

PROJECT SIZE NUMBER OF DOCUMENTS
SMALL 10-15
MEDIUM 15-20
LARGE 20-40

 Document for Development team:

Development team is real audience or user of the technical document, they will be interested in knowing how system has been developed on low level like how classes modules packages or namespaces are written and related to each other. So, the document should give some detailed insight about  how each component/module  works, their dependencies,  reuse , performance considerations and  best practices.

Well, i also do believe that taste changes from organization what all needs to be provided. Thinking honestly ,I experienced list of below sections are required in TSD.

  1. Introduction :This section should dive brief introduction about application/project
  2. Overall High Level Architecture(block diagrams): This section should include overall high level architecture which includes layers and components used for designing/developing application


  3. Detail architecture(block diagrams): This section shows Low level design of the system which includes components and respective classes used


  4. Component diagram/architecture: This section gives details about components of each layer and their interaction, you can use UML/Visio or any free tool to design components, classes and interfaces interaction and dependency.


  5. Technological implementation of each component or module( if different languages used for respective module)
  6. Deployment methodology( e.g. click once deployment, X COPY) and How components will be packaged and will be made ready for installation/deployment(Software Packing)
  7. Sequence Diagrams: UML sequence diagrams are used to show how objects interact in a given situation. An important characteristic of a sequence diagram is that time passes from top to bottom : the interaction starts near the top of the diagram and ends at the bottom


  8. Deployment diagrams: This section should include complete deployment diagram which will describe the hardware components where software components are deployed. Component diagrams and deployment diagrams are closely related. Component diagrams are used to describe the components and deployment diagrams shows how they are deployed in hardware. UML is mainly designed to focus on software artifacts of a system. But these two diagrams are special diagrams used to focus on software components and hardware components. Deployment diagrams are useful for system engineers. An efficient deployment diagram is very important because it controls the following parameters
    1. Performance
    2. Scalability
    3. Maintainability
    4. Portability


  9. Naming conventions( Coding, assemblies, database objects): here you have to give some small examples of your code with coding standards like the way you are defining classes,methods,variable...
  10. Tiered and Layered Architecture :Here you should show layers of the application and make sure that you are explaining whether your application layer can be deployed on multiple services independently.
  11. Database diagrams(ERD): You can use Database server or other architect tool for database diagram generation and include them in TDS . Here you can show ERD diagram which will include all database table with relation..


  12. How exceptions are handled: Here you will explain Exception handling in detail like whether you are using any utility like log4net or custom application level exception handling .You should document every exception that might be thrown by your code, including those in any methods that you might call.
  13. Class diagrams: You can use VS or eclipse or any free tool for class generation and include them in TDS . Class diagrams look like as shown below


  14. Data access technology proposed like ADO.NET ,Entity framework ,hibernate ,JDO,JDBC API and reason behind choosing the data access technology

Final Word

A technical specification is a document that defines a set of requirements that a product or assembly must meet or exceed. A product or assembly that does not meet all of the specifically expressed requirements does not meet the specification, and often is referred to as being out of specification or "out of spec."

Saturday 13 February 2016

Login with facebook and graph API using Asp.net

Live Demo

Overview
Web is getting more and more occupied by Social Media  now days so, most of the websites are trying to take advantage  of this social buzz by integrating them in multiple ways. Obviously ,It saves great time for the end user too like , rather than creating account/Registering in websites to access resources which is very time consuming and boring  ,they just login with single click.Facebook has turned out to be the holders of user information that can be used to be the secure gateway/login into your web applications. Best part of it is your website can easily have huge user base with time by using Facebook authentication.
In this article, we will look at a simple web application, that can help you how to implement Login By Facebook functionality using asp.net web application.
Well, before implementation It is important to make  Facebook aware about our application. I mean to get Registered inside Facebook.

How To Register your Application in Facebook

To Register your application in Facebook you need to fallow below steps
go to https://developers.facebook.com

:-


Great you have registered your application,i mean Facebook knows your application now and will recognize requests from your application

HOW IT WORKS:

When user clicks on Sign in with Facebook button,i mean when user authenticate against Facebook, Facebook in return with send Access Token, which we can use on behalf of user to make further requests to Facebook.

SET UP ASP.NET WEB APPLICATION

We need to pages here:

  1. User UI  Login.aspx with Login link/button, which allows user to click and open Facebook Login dialog
  2. A FacebookLogin.aspx.cs page[code behind] to which we redirect authenticated user to get additional information about user from Facebook.It acts as callback page
  3. A class which will hold Facebook user details
  4. Web Config which will hold client id and other required details 

FacebookLogin.aspx

<%@ Page Language="C#" AutoEventWireup="true" 
CodeBehind="FacebookLogin.aspx.cs"
 Inherits="Faith.Web.Presentation.FacebookLogin" %>

<html xmlns="http://www.w3.org/1999/xhtml">
<head>
    <title>Facebook Login</title>
 <script>
         //THIS IS CODE WHICH WAS CREATED WHILE REGISTERING OUR APPLICATION IN FACEBOOK CONSOLE
         //JUST COPY AND PASTE THAT SCRIPT
       window.fbAsyncInit = function () {
          FB.init({
              appId: '***************',
              status: true, // check login status
              cookie: true, // enable cookies to allow the server to access the session
              xfbml: true, // parse XFBML
              oauth: true,
              version: 'v2.5'// enable OAuth 2.0
          });
      };
      (function () {
          var e = document.createElement('script'); e.async = true;
          e.src = document.location.protocol +
          '//connect.facebook.net/en_US/all.js';
          document.getElementById('fb-root').appendChild(e);
      }());

      function loginByFacebook() {
          FB.login(function (response) {
              if (response.authResponse) {
                  FacebookLoggedIn(response);
              } else {
                  console.log('User cancelled login or did not fully authorize.');
              }
          }, { scope: 'user_birthday,user_about_me,user_hometown,user_location,email,publish_actions' });
      }

      function FacebookLoggedIn(response) {
          var loc = 'Facebooklogin.aspx';
          if (loc.indexOf('?') > -1)
              window.location = loc + '&authprv=facebook&access_token=' + response.authResponse.accessToken;
          else
              window.location = loc + '?authprv=facebook&access_token=' + response.authResponse.accessToken;
      }

    </script>
</head>
<body>
    <form id="form1" runat="server">
   <div>
     <a href="javascript:void(0)" onclick="facebookLogin();">
<img alt="Login with Facebook" src="img/btn-signin-facebook.png" style="border: none;" /></a>

    </div>
</form>
</body>
</html>


FbUser

  public class FbUser
    {
        public long id
        { get; set; }

        public string email
        { get; set; }

        public string name
        { get; set; }

        public string first_name
        { get; set; }

        public string last_name
        { get; set; }

        public string gender
        { get; set; }

        public string link
        { get; set; }

        public DateTime updated_time
        { get; set; }

        public DateTime birthday
        { get; set; }

        public string locale
        { get; set; }

        public string picture
        { get; set; }

        public FbLocation location
        { get; set; }
    }
    public class FbLocation
    {
        public string id
        { get; set; }

        public string name
        { get; set; }
    }

FacebookLogin.aspx.cs

As we passed the access token from the FacebookLogin.aspx in querystring, we can use that here to make an API call to Google+ userinfo/email method to retrieve the user's email address. Using JavaScriptSerializer class we can deserialize the json string into the .net classes we created in first step.

 public partial class FacebookLogin : System.Web.UI.Page
    {
        protected void Page_Load(object sender, EventArgs e)
        {
            if (Request.QueryString["access_token"] != null)
            {
                if (string.IsNullOrEmpty(Request.QueryString["access_token"]))
                {
                    //   return; //ERROR! No token returned from Facebook!!
                    Response.Redirect("~/FacebookLogin.aspx");
                }
                //let's send an http-request to facebook using the token            
                string json = GetFbUserJSON(Request.QueryString["access_token"]);
                //and Deserialize the JSON response
                JavaScriptSerializer js = new JavaScriptSerializer();
                FbUser oUser = js.Deserialize<Fbuser>(json);
                //Here i take oUser Object properties value like email,userid and save them in session object
                //OTHER WAY YOU CAN SAVE THESE VALUES IN DATABASE
                HttpContext.Current.Session["Username"] = oUser.email.ToString();
                HttpContext.Current.Session["UserId"] = oUser.id.ToString();   
                //redirect user to authenticated homepage here now
                HttpContext.Current.Response.Redirect("Account/");   
            }
        }
        /// 
        /// sends http-request to Facebook and returns the response string
        /// 
        private static string GetFbUserJSON(string access_token)
        {
            string url = string.Format("https://graph.facebook.com/me?access_token={0}&
                        fields=email,name,first_name,last_name,link", access_token);
            WebClient webClient = new WebClient();
            Stream data = webClient .OpenRead(url);
            StreamReader reader = new StreamReader(data);
            string str = reader.ReadToEnd();
            data.Close();
            reader.Close();
            return  str ;
        } 
    }
 

Here is screen shot which shows JSON oUser after deserialize,you can fetch all object properties and save in database


Hope this helps Shabir

How to Build a Full-Stack Web App with Blazor

  Blazor Stack Overview Important Points: Blazor stack gives you options to create Web Applications without writing JavaScript (doesn't ...